|
| ||||||||||||||||||||||||||||||||||||||||||||||||||||||||||
|
QUICK SETUP GUIDE GENERAL This section describes the installation of the monitor. The monitor is pre-aligned at the factory to user input requirements. However, there may still be the need for some minor adjustments to be made. Those procedures will be provided later in the adjustment section. UNPACKING Before unpacking, the carton should be inspected for shipping damage. The carton should be carefully opened and the monitor removed. The monitor should then be carefully inspected for shipping damage. If damage has occurred, the shipping carton and all packing materials should be saved for possible inspection by the shipping company. The shipping company should be notified at this time. AC POWER CONNECTION Before connecting the monitor, determine the a/c. power that is to be used and that the monitor is configured properly for that voltage. The voltage of the monitor may be changed at the power supply module accessible from the rear of the unit. The power supply must be removed for access to the voltage select switch. The power supply is configured for 110V operation at the factory unless otherwise specified by the customer. CONNECTIONS
CALIBRATION PROCEDURES NOTE: When the monitor is placed in the Calibrate Mode a definite programmed sequence of calibration steps must be followed. TO CALIBRATE: Press the degauss button and hold for five seconds. VERTICAL POSITION ADJUSTMENT Adjust the vertical position by rotating the contrast control slowly until the picture is set to the desired position. This adjustment should be carefully adjusted to position the center of the image at the center of the phosphor. To advance to the vertical size adjustment mode, press and release the Degauss/CAL switch. VERTICAL SIZE ADJUSTMENT Adjust the vertical size by rotating the contrast control slowly until the picture is set to the vertical size as desired. This adjustment should be carefully adjusted to position the bottom edge of the image about one-half inch from the bottom of the phosphor. To advance to the horizontal position adjustment mode, press and release the Degauss/CAL switch. HORIZONTAL POSITION ADJUSTMENT Adjust the horizontal position by rotating the contrast control and then set the desired horizontal position. To advance to the horizontal size adjustment mode, press and release the degauss/mode switch. HORIZONTAL SIZE ADJUSTMENT Adjust the horizontal size by rotating the contrast control and then set the horizontal size to the desired value. To advance to the horizontal trap mode, press and release the degauss/mode switch. TRAPEZOID ADJUSTMENT Make the trapezoid adjustment by rotating the contrast and then set the control to eliminate the trapezoidal effect. To advance to the pincushion adjustment mode, press and release the Degauss/CAL switch. HORIZONTAL PINCUSHION ADJUSTMENT Make the pincushion adjustment by rotating the contrast control and then set the control to eliminate any pincushion effect. To advance to the horizontal pincushion phase mode, press and release the Degauss/CAL switch. HORIZONTAL LINEARITY ADJUSTMENT Make the horizontal pincushion phase adjustment by rotating the contrast control and then set the control to the desired adjustment. To exit the calibration procedure, press and release the Degauss/CAL switch twice at which time the contrast knob will return to controlling the contrast function. REMOTE CONTROL OPERATION Adjustments to the monitor are made from the monitor remote control. The remote control includes a membrane keypad with a Liquid Crystal Display (LCD). The remote control panel provides monitor select, color balance, geometry and control level information all on the LCD. Monitor adjustment parameters are detailed in Table 1.1. To enter adjustment mode press the key of the monitor desired (in single monitor systems this is #1). Then press the key of the desired adjustment. Press the large up and down arrows for coarse adjustments and the small arrows for fine adjustments. The results of the adjustments are stored in temporary memory until they are saved by pressing F2 from the main menu at which time they are stored in permanent memory. 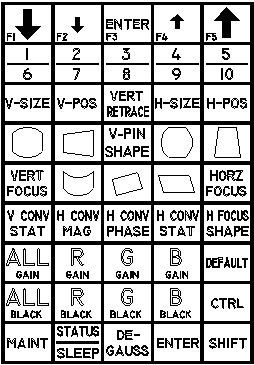 Figure 1: Hand-Held Remote Control Keypad
Remote Adjustment Controls
|


 |
          |
 |